Introduction
This series of examples shows how to do many common activities with the DrChrono API. For more detailed information, view the documentation. If you are upgrading from a previous version, view the changelog.
Create an account
You need a free DrChrono account in order to create and test your application. Sign up!
Create your application
To create your application, go to the API management page (also available under "Account" > "Other Settings" > "API") and click the "New Application" button. Fill in the name of your application and add one or more Redirect URIs, then click the "Save Changes" button on the bottom.
A Redirect URI is a web location starting with http:// or https:// that
the user will be redirected to during the log-in flow. Note that this must be an address you control,
but it need not present any content to the user, although we do recommend presenting a helpful
message such as "Congratulations! You just integrated with :app!".
Client setup
We recommend using an OAuth 2.0 library. This page lists clients for various popular programming languages. You can find your client id, secret, and redirect URIs for configuring your library on the API management page.
- Authorize URL:
https://drchrono.com/o/authorize/ - Access Token URL:
https://drchrono.com/o/token/
However, OAuth 2.0 isn't terribly complicated, and this tutorial only assumes a general-purpose HTTP client library.
The DrChrono API is versioned. When you create an application, it will default
to using the latest version. This can be modified at any time, and can be set
per-request with the X-DRC-API-Version header.
OAuth
Our API uses OAuth 2.0, a common web based authentication system. It provides a straightforward way for a provider to grant access to their data to your application.
Authentication workflow
There are three main steps in the OAuth 2.0 authentication workflow.
- Redirect the provider to the authorization page.
- The provider authorizes your application and is redirected back to your web application.
- Your application exchanges the
authorization_codethat came with the redirect into a pair ofaccess_tokenandrefresh_token.
Step 1: Redirect to drchrono
The first step is redirecting your user to DrChrono, typically with a button labeled "Connect to drchrono" or "Login with drchrono". This is just a link that takes your user to the following URL:
https://drchrono.com/o/authorize/?redirect_uri=REDIRECT_URI_ENCODED&response_type=code&client_id=CLIENT_ID_ENCODED&scope=SCOPES_ENCODED
REDIRECT_URI_ENCODEDis the URL-encoded version of the redirect URI (as registed in your application and used in later steps)CLIENT_ID_ENCODEDis the URL-encoded version of your application's client IDSCOPES_ENCODEDis a URL-encoded version of a space-separated list of scopes, which can be found in the documentation or omitted to default to all scopes
Step 2: Provider authorization
After logging in (if necessary), the provider will be presented with a
screen with your application's name and the list of permissions you
requested (via the scope parameter).
If they click the "Authorize" button, they will be redirected to your
redirect URI with a code parameter appended containing an
authorization code (see step 3). If they click the "Cancel" button,
they will be redirected to your redirect URI with an error parameter
with the value access_denied instead.
Note: this authorization code expires in a matter of seconds, so you must perform step 3 immediately, ideally before rendering the resulting page for the end user.
Step 3: Token exchange
The code obtained from step #2 is usable exactly once to obtain a
pair of access token and refresh token like this:
import datetime, pytz, requests

if 'error' in get_params:
    raise ValueError('Error authorizing application: %s' % get_params[error])

response = requests.post('https://drchrono.com/o/token/', data={
    'code': get_params['code'],
    'grant_type': 'authorization_code',
    'redirect_uri': 'REDIRECT_URI',
    'client_id': 'CLIENT_ID',
    'client_secret': 'CLIENT_SECRET',
})
response.raise_for_status()
data = response.json()

# Save these in your database associated with the user
access_token = data['access_token']
refresh_token = data['refresh_token']
expires_timestamp = datetime.datetime.now(pytz.utc) + datetime.timedelta(seconds=data['expires_in'])
That's it. You now have all you need to make API requests authenticated as that provider. When using this access token, you'll only be able to access the data that the user has access to and that you've been granted permissions for.
Refreshing an access token
Access tokens only last 10 hours (given in seconds in the
'expires_in' key in the token exchange step above), so they
occasionally need to be refreshed. It would be quite a pain to have to
re-authenticate the user every session, so instead you can make use of
the refresh token in a manner very similar to the authorization code
step above. Just replace the pair code parameter with
refresh_token, change the grant_type value from
authorization_code to refresh_token, and remove the redirect_uri
parameter.
...
response = requests.post('https://drchrono.com/o/token/', data={
    'refresh_token': get_refresh_token(),
    'grant_type': 'refresh_token',
    'client_id': 'CLIENT_ID',
    'client_secret': 'CLIENT_SECRET',
})
...
Main API Usage
Getting user information
In cases where DrChrono is used for single sign-on, often the first
request that's made is to /api/users/current
to get information about the currently logged in user:
import requests

response = requests.get('https://drchrono.com/api/users/current', headers={
    'Authorization': 'Bearer %s' % access_token,
})
response.raise_for_status()
data = response.json()

# You can store this in your database along with the tokens
username = data['username']
Getting the patient list
The /api/patients endpoint, like all list endpoints, is
paginated. You'll need to iterate over the results to get them all.
import requests

headers = {
    'Authorization': 'Bearer ACCESS_TOKEN',
}

patients = []
patients_url = 'https://drchrono.com/api/patients'
while patients_url:
    data = requests.get(patients_url, headers=headers).json()
    patients.extend(data['results'])
    patients_url = data['next'] # A JSON null on the last page
If you have a patient's name or email address, you can pass the
?search= parameter (possibly multiple times) to narrow down the
patients returned. You can also query by the gender and date_of_birth
fields.
Creating resources
Resources are created by sending a POST to the relevant top-level
resouce. For example, to create an appointment, the appointment's
information is sent to /api/appointments like this:
import requests

headers = {
    'Authorization': 'Bearer ACCESS_TOKEN',
}
data = {
    'doctor': 1234,
    'duration: 30, # in minutes
    'office': 3456,
    'patient': 5678,
    'scheduled_time: '2014-08-01T14:30:00',
}
url = 'https://drchrono.com/api/appointments'

r = requests.post(url, data=data, headers=headers)

assert r.status_code == 201 # HTTP 201 CREATED
Uploading documents
Uploading a document into a patient's chart is straightforward:
import datetime, json, requests

headers = {
    'Authorization': 'Bearer ACCESS_TOKEN',
}
data = {
    'doctor': 1234,
    'patient': 5678,
    'description': 'Short document description here',
    'date': '2014-02-24',
    'metatags': json.dumps(['tag1', 'tag2']),
}
with open('/path/to/your.pdf', 'rb') as f:
    files = {'document': f}
    requests.post(
        'https://drchrono.com/api/documents',
        data=data, files=files, headers=headers,
    )
IFrame integration
Some API apps provide additional functionality for interacting with patient data not offered by DrChrono, and can benefit by being incorporated into DrChrono's patient information page via IFrame. We have created a simple API to make this possible.
To make an existing API application accessible via an IFrame on the patient page, contact DrChrono support. You will need to provide the URL that the IFrame will use, and the height and width it should have. The application will be reviewed before it is approved to ensure that it is functional and secure.
Register a Doctor
IFrame applications will appear as choices on the left-hand menu of the patient page for registered doctors. To register a doctor, request
POST /api/iframe_integration
authenticated with your OAuth2 token for the corresponding doctor. To deregister
a doctor, make a DELETE request to the same URL.
Populating the IFrame
There are two places where the IFrame can be displayed, either within the patient detail page or the clinical note page, shown below respectively:
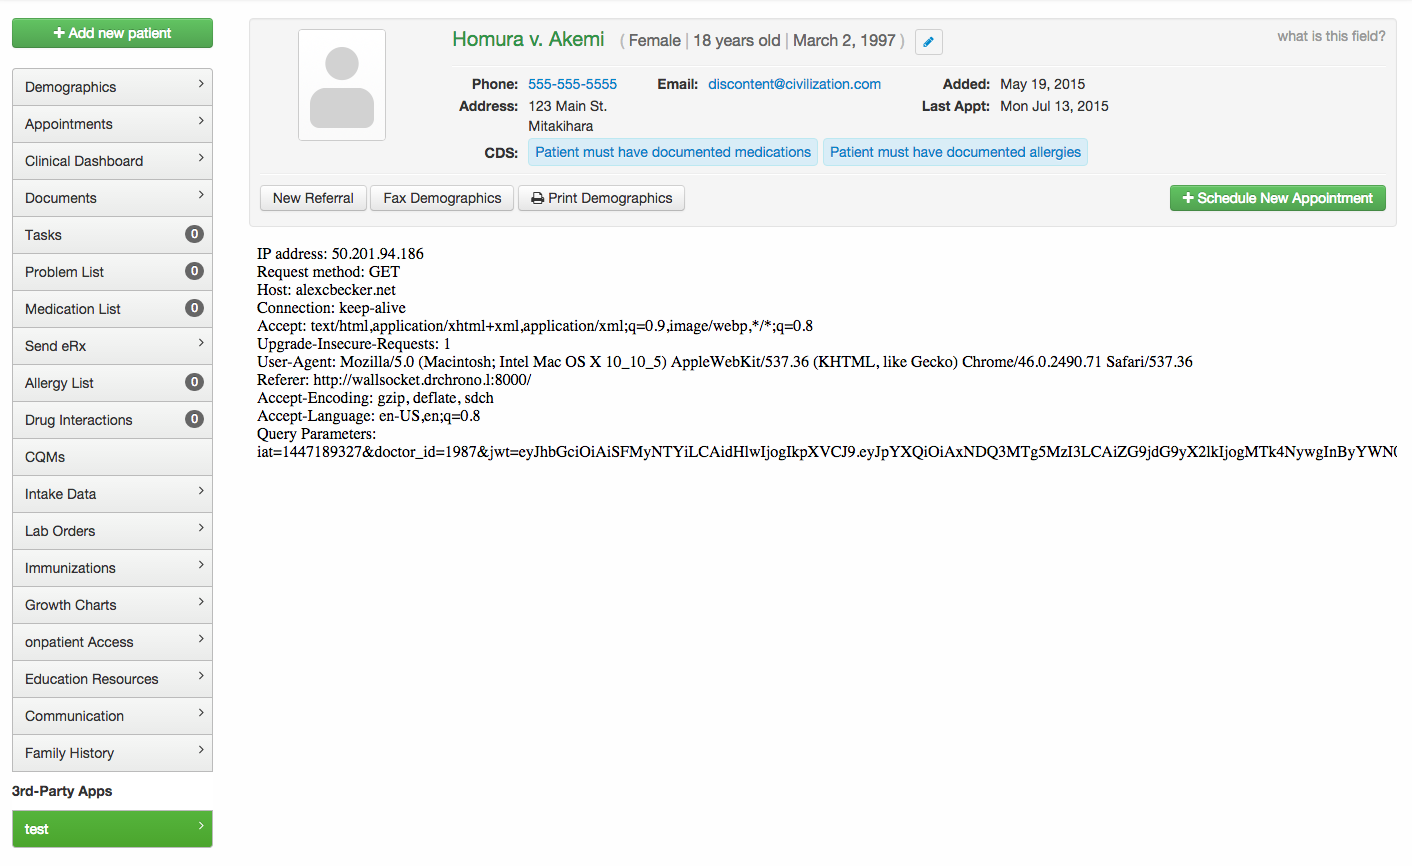
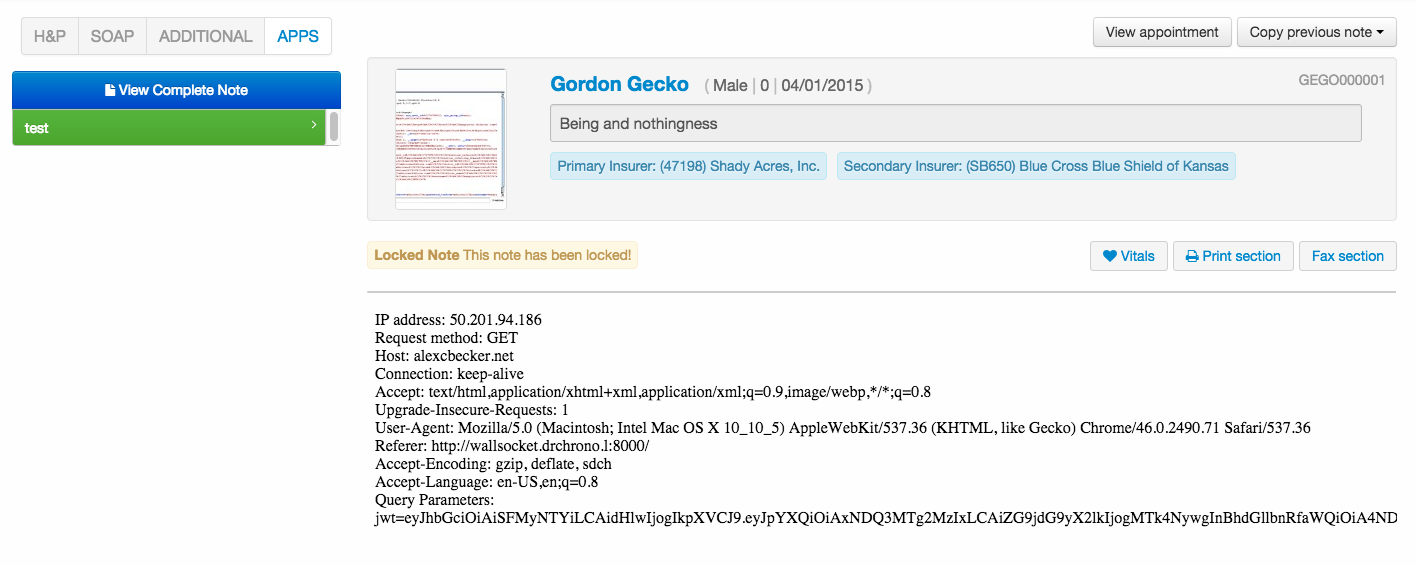
When requesting approval for your IFrame app, you must specify a URL for one or both of these pages
which will serve as the base URL for your IFrame contents. When a doctor views
your IFrame, the source URL will have various query parameters appended to it,
for example for the patient page the src parameter of the IFrame will be:
<iframe_url>?doctor_id=<doctor_id>&patient_id=<patient_id>&practice_id=<practice_id>&iat=<iat>&jwt=<jwt>
The jwt parameter is crucial if your application transfers any sort of PHI and does not implement its own login system.
It encapsulates the other parameters in a JSON web token and signs them
using SHA-256 HMAC with your client_secret as the key.
This verifies that the IFrame is being loaded within one of DrChrono's pages by an authorized user.
In production, you should validate the JWT using an approved library (which are listed on the official site),
and only use the parameters extracted from the JWT. Using Python and Django, this might look like:
import jwt

CLIENT_SECRET = <client_secret>
MAX_TIME_DRIFT_SECONDS = 60

def validate_parameters(request):
    token = request.GET['jwt']

    return jwt.decode(token, CLIENT_SECRET, algorithms=['HS256'], leeway=MAX_TIME_DRIFT_SECONDS)
Recall that modern browser's same-origin policy means that data cannot be passed between your application and DrChrono's page through the IFrame. To interact with DrChrono's data on the doctor and patient in question, use the provided IDs to query the API.